Kiel Figgins - Character Animator
Film
Broadcast
Personal
Resources
Reel
Resume
Contact
Store
For more frequent animation tips, follow me on Twitter @KielFiggins
Character Shadows in the viewport/playblasts - Animation - Link
A cheap way to get a shadow of a character to appear for a playblast is:
-Duplicate the bound skin (without input), so you end up with another mesh seperate from the bound mesh
-Add a blend shape from the bound skin to the duplicated mesh, so it will move around exactly with the bound skin
-Unlock the scale channels of the duplicated skin and set scale Y to .01
-Apply a dark, semi-transparent shader on the squashed mesh
Now the same motion is being applied but the mesh is squashed to give the impression of a shadow and you're good to go.
Here's an example
Explicit Zooming in the Graph Editor - Animation - 1/21/09 - Link
Holding shift / alt in the G.E. while you zoom in with your mouse will scale horizontally and vertically depending on how you move your mouse. This may take a bit of getting used
to, but once your comfortable you'll be able to quickly zoom in on tangents to see slight wobbles and over shoots. Very helpful when trying
to create ease ins/outs for cameras.
Viewing / Adjusting all keys in your scene - Animation - 11/09/08 - Link
With more complex scenes, adjusting timing can be very difficult. Shaders, character sets, shape nodes and many other elements can bury keys that can't be easily selected. With that
in mind, you can see and adjust all the keys quickly in the Dope Sheet.
- Windows > Animation Editors > Dope Sheet
- View > Scene Summary
Now all the black ticks are keys in your scene. You can adjust them like any other keys in the Graph Editor.
Adding new objects to Lattices - Setup - 10/14/08 - Link
There are times when you want to have an existing lattice deform a new object. Either the mesh was updated or changed all together. This is common
when your using a lattice to animate the object. If you were to reapply the lattice, you'd have to re animate it as well. So to add new elements
to an existing lattice:
1. Relationship Editors > Deformer Sets
2. Select the defomer on the left list, then select the new objects on the right list
Using equations to adjust values and times - Animation - 10/10/08 - Link
If you need to adjust a value in Maya, you can use equations in the Channel box, Attribute Editor, Graph Editor or anywhere else you can enter a value.
Lets say for example you want to move a cube an additional 10 units up from its current location. In the channel box you'd type in +=10 in the translate Y
channel. Once you hit enter, the cube should move accordingly.
This comes in handy for animation not only with values but also with time. Say you need to move all your keys over 100 frames exactly. Selecting all your keys
then in either the Graph Editor or Dope sheet, enter in +=100 in the Time field (the one on the left, where value is on the right). And your keys should move
accordingly.
Connecting Scale to Distance (for stretchy IK type setups) - Rigging - 10/06/08 - Link
1. Create a two joint chain
2. Create > Measuring Tools > Distance Tool
3. Snap the first locator to the first joint
4. Snap the second locator to the second joint
5. Window > Render Editors > Hypershade
6. Select distanceDimenion1 and Joint1
7. Map the Input and Output connections (little button with two > > arrows)
8. Hypershade > Create > General Utilities > Multiple Divide Nodes
9. Connect distanceDimensionShape1.distance to multiplyDivide1.inputX
10. Select multipleDivide1
11. Open the Attribute Editor
12. Set Input2X to whatever value your Input1X is (in my case 6.512)
13. Set multipleDivide1 operation to Divide
14. Connect multipleDivide1.outputX to joint1.scaleX

Bonus - Aiming the joint:
1. Select Locator1 then select Joint1
2. Point Constrain them
3. Select Locator2 then select Joint1
4. Aim Constrain them, settings:
	-maintain offset: off
	-Aim Vector: X
	-Up Vector: Y
	-World up: Scene
	-Constrain Axes: All

Now as you move the locators around, the joint scales and aim appropriately.
Writing Information from Maya to a Text file - MEL - 10/03/08 - Link
There are times that you'll want to output certain information to a text file, such as camera data, key or file information. Here's the
straight forward way of doing so:
//Create the text file and write over all existing content
string $exampleFileName = "C:/NewTextFile.txt";
$fileId=`fopen $exampleFileName "w"`;
fprint $fileId "First Line of Actionrn";
fclose $fileId;

//Append a string to the end of an existing file
string $exampleFileName = "C:/NewTextFile.txt";
$fileId=`fopen $exampleFileName "a"`;
fprint $fileId "Line2rn";
fclose $fileId;
Inserting keys without disrupting existing curves - Maya - 09/29/08 - Link
When the need arrises to insert a key directly onto a curve, but you don't want to ruin your existing curves and tangents, try this. Select
the channels in your channel box (say translate x,y,z), then run the mel line below. This will place a key with tangets that match the insert
location. This is nice for adding a key at the peak/valley of curve you've crafted through tangents.
channelBox -e -exe "setKeyframe -i -at "#A" #N;" 1 $gChannelBoxName;
thanks to Chris Adams for the tip
Getting MEL Help on Forums - MEL - 09/25/08 - Link
If your hitting a problem in mel scripting, use the search feature on cgtalk and specify the Maya Programming forum.
Typically it will yield an answer. Questions like finding a vertex position in space and such can
be found in a matter of moments, instead of having to dig through documents (though maya docs are great).
Better presentation on online Forums - Forums - 09/22/08 - Link
When posting revisions or updates to your work on a forum, update your first post as well as a new post.
This way when you post your revisions, someone new to the thread doesnt comment on old work (from your first post),
nor do they have to dig through pages of comments to find your latest work.
Repetitive Stress in your Hands - Health - 09/19/08 - Link
If the tendons on the back of your hands burn, which mine do after several hours on the computer, try this. I spoke with my doctor, he recommends a soft stress ball (not a tennis ball), to squeeze every hour on the hour ten time
in each hand. And immediately once the strain sets in. So far it helps. Also, if it gets bad, look into a rub on ointment called BioFreeze, works wonders.
Its a bit more powerful then Icy Hot.
Lattices can bind to Joints - Maya - 09/18/08 - Link
The same way you bind polygons to joints, the same can be said for lattices. This opens up a few more options with specific skinning / deformation situations.
Such as deforming non bound objects, or making lattices easier to animate by adding an underlying bone structure.
Use Masking to speed up Animation - Maya - 09/17/08 - Link

When your animating, if you turn on/off various selection masks, it makes selecting your rig/ctrls much easier. I trypically have all but Nurbs Curves
turned off. This way, I can only select curves. Helps prevent keying or moving rig or scene elements.
thanks to Charles Lin for the tip
Outliner Tips - Finding and Expanding - Maya - 09/17/08 - Link
Finding the Selected Item
With an object selected and your cursor in the Outliner window. Hitting F will expand your outliner to reveal the object you have selected. Works great when s
electing joints in a larger hierarchy.
Explanding Hierarchies
Shift + LMB on the expand option (the + sign) in the outliner collapses or expands all of the hierarchies below it.
Frame Counter in Quicktime - Animation - 09/17/08 - Link
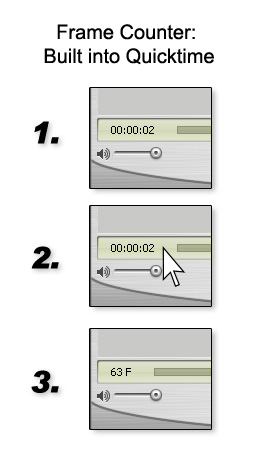
Found out that Quicktime has a Frame Counter built into it. Now you still have to view it
in the external player (so not streaming off a website) but still a simple and easy tool for quick feedback.
thanks to Jorma Auburn for the tip
Don't have windows open when your scene Opens - Maya - 09/17/08 - Link
Windows > Settings / Preferences > Interface > UI Elements. Uncheck When Opening [] Restore saved layouts from file. Nothing is more frustrating when opening a file
and having a dozen windows blast your screen. Not to mention a heavy scene file with the hypershade open, and maya having to load in all the shader balls. With this
unchecked, it will retrain whatever windows your currently have open.
thanks to Chris Adams for the tip
Turn off the Pink (associated) ctrls when Animating - Maya - 09/17/08 - Link
Windows > Settings / Preferences > Display. Change View > Affected highlighting to Off. This way, when your animating and grabbing controls and objecs,
your entire rig doesn't turn pink and green. A minor item, but I find it personally distracting.
thanks to Chris Adams for the tip
Adding a frame counter to playblasts - Maya - 09/16/08 - Link
//Frame Counter for Heads Up Display
//Make sure the HUD is being shown, in the Viewport > Show > HUD
//When playblasting, make sure 'Show Orientments' is Checked
if (`headsUpDisplay -ex HUDFrameCounter` != 1)
{
    headsUpDisplay
        -section 5
        -block  5
        -blockSize "small"
            -label "Frame:"
            -labelFontSize "large"
            -dataFontSize "large"
            -command "currentTime -q"
            -attachToRefresh
            -padding 75
        HUDFrameCounter;
} else {headsUpDisplay -rem HUDFrameCounter;}
Dealing with Gimbal lock in animation - Maya - 09/16/08 - Link
//Select the object that has keyed rotations and is hitting gimbal lock
//EulerCleaner Script
string $A[] = `ls -sl`;
performEulerFilter graphEditor1FromOutliner;
filterCurve $A.rotateZ $A.rotateY $A.rotateX;
Moving polygons by their normals - Maya - 09/16/08 - Link
Want to make a sleeve puffier? Pretty much want to move along the normals direction on a polygon object?
-Select the verts of your mesh
-Modify > Transform Tools > Move Normal Tool
-Move along the yellow N axis
-Or access this option by selecting the verts, holding down 'w', left mouse clicking (brings up the marking menu), then selecting Normal
thanks to Trenity DeWitt for the tip
Select Polygons by face, not center point - Maya - 09/15/08 - Link
Windows > Settings / Preferences > Settings > Selection. Change Polygon Selection from Center to Whole face. This will allow you to quickly
select polygons instead of trying to click specifically on the center point.
Emailing Professionals - Career - 09/15/08 - Link
Don't mass mail professionals. Sending out individual emails will yeild greater chances of getting personal feedback. If you took the time to
write an email, we'll hopefully take the time to write one back.