“Bird Flapping Tutorial for Maya”
By
Kiel Figgins
www.3dfiggins.com
Introduction
This tutorial is designed for the beginner Maya user who wishes to learn the basics of animation, in a step by step fashion. This tutorial covers the creation of the model to be used, setting keyframes and making a looping animation.
If you do not wish to create the model, then the file has been provided for you in the Resource folder.
As for the animation side of this tutorial, I tell you the value and frames to set. This is a very linear way of working and doesn’t promote experimentation and variety. Again, this is designed for animators starting out, if you wish to alter it after you’ve gone through it, then by all means.
Animation is about what ‘feels’ right, so it will be slightly different person to person. So go and head and make it your own.
Download These Files Before Starting
-Tutorial Package - .5mb - (includes resource files, saved files, word doc of tutorial and movie)
-Printable Word Doc of tutorial - 1mb - (optional)
Table of Contents
- Creaing the Body
----- Creating the Left Wing
----- Creating the Right Wing
----- Mesh Cleanup
----- Constraining the Wings
----- Cleaning the Channels
- Prepping for Animation
- How to Set Keys
- Staring to Animate the Body
- Blocking out the Wings
- Refining the Body
----- Refining the Left Wing Base
----- Refining the Wing Base Twist
----- Refining the Wing Base Angle
----- Refining the Wing Tip Flap
----- Refining the Wing Tip Twist
----- Refining The Wing Tip Angle
- Copying the Keys from Left to Rig
- Finishing the Body
----- Body Angle
----- Body Twist
----- Body TX
----- Body TZ
- Finalzing the Animation
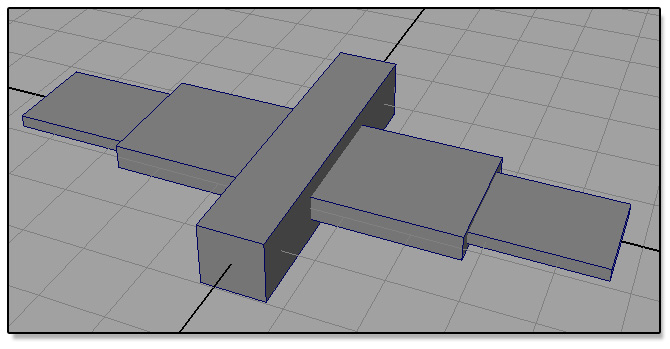
Creating the Body
-File > New Scene
-Create > Polygon Primitive > Cube > Option Box
-Edit > Reset Settings
-Click Create
-Name pCube1 = "Body"
-Body Scale Z = 5
Creating the Left Wing
-Create > Polygon Primitive > Cube
-Name pCube1 = "L_Wing_Base"
-L_Wing_Base Translate X = 1.5
-L_Wing_Base Scale:
X = 2.5
Y = .4
Z = 2
-With L_Wing_Base selected
-Press Insert on your keyboard
-Hold down 'x' and click and drag the pivot to the grid origin
-Press Insert when your done
-Edit > Duplicate > Option Box
-Edit > Reset Setting
-Click Duplicate
-Name L_Wing_Base1 = "L_Wing_Tip"
-L_Wing_Tip Translate X = 4
-L_Wing_Base Scale:
X = 2
Y = .2
Z = 1.5
-Select L_Wing_Tip, shift select L_Wing_Base
-Press 'p' to parent
Creating the Right Wing
-Select L_Wing_Base
-Edit > Duplicate > Option Box
-Scale X = -1
-Click Duplicate
-Name L_Wing_Base1 = "R_Wing_Base"
-Name the tip of the right wing "R_Wing_Tip"
Mesh Clean Up
-Select all of the pieces
-Edit > Delete By Type > History
-Modify > Freeze Transformations
Constraining the Wings
-Select Body, shift select L_Wing_Base
-Press 'F2' to go to the Animation Menu
-Constrain > Point > Option Box
-Edit > Reset Settings
-Check Maintain Offset
-Click Add
-Select Body, shift select R_Wing_Base
-Constrain > Point
Cleaning the Channels
-Select the four wing pieces
-In the Channel Box, select all the Translate, Scale and Visibility Channels
-Right Click over the channels and select "Lock and Hide Selected"
-Select Body
-In the Channel Box, select all the Scale and Visibility Channels
-Right Click over the channels and select "Lock and Hide Selected"
From here you should be ready to go on to animation.
Prepping for Animation
-Window > Animation Editors > Graph Editor
-Turn on Autokey by pressing the key button in the bottom Right of the screen
-Click the Animation Preferences button
*It's located at the bottom right, next to the Autokey button
-Click on Settings in the List to make sure Time is set to NTSC (30 fps)
-Click on Timeline in the List to make sure Playback Speed is Real-time (30 fps)
-Click Save
-Set your timeline from 0 to 40
-Set your current time to frame 0
How to Set Keys
-Select all of the bird's pieces
-Press shift + w , this will key all the translates
-Press shift + e , this will key all the rotates
Staring to Animate the Body
-Select Body, move it translate y to about 8
-Go to frame 40
-Select Body, shift + w
-Go to frame 20
-Select Body, move it translate y to about 5
*You'll notice a key was set, that’s because we have Autokey on
-Click the Play button at the bottom right
You can see the bird is now bobbing up and down, but it has a noticeable hitch at the top of the loop. To fix this:
-Click Stop
-Select the Body
-In the Graph Editor (abbreviated as GE from here on out), select the Translate Y (TY from now on)
-Press 'f' to frame the curve
-View > Infinity
-Curves > Pre Infinity > Cycle
-Curves > Post Infinity > Cycle
-Select the keys at frames 0 and 40
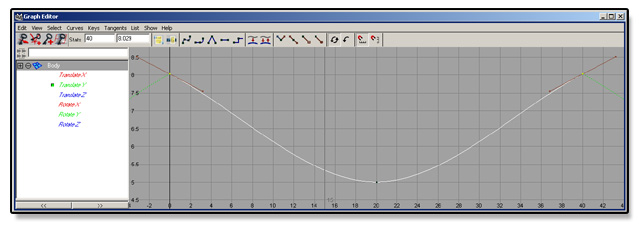
-Click the Flat Tangents button

Now your bird is bobbing pretty smoothly
Blocking out the Wings
-Go to frame 0
-Select L_Wing_Tip, then shift select L_Wing_Base
-Press 'e' to rotate
-Rotate Z (the Blue circle) about 45
-Go to frame 40
-Press shift + e
-Go to frame 20
-Rotate Z (the Blue circle) about -45
-Click Play
You'll see that same hitch happening at the top of the loop, fix it the same way we fixed it in the body.
Repeat the same blocking out for the right side, only you'll have to go -45 on frame 0 and 40, and 45 on frame 20. Now you should have something that looks like this:
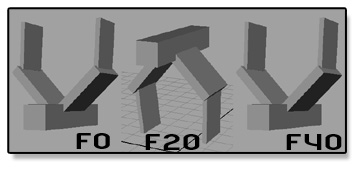
It's a good start, but far from being done. A big thing is just in this blocking phase it seems much too slow, so we'll fix that first.
-Select all the Pieces
-Set your timeline to 0 to 45
-Go to frame 40
-Shift click and drag from frame 40 to 0
*Your timeline should turn red
-There’s a black arrow facing right at frame 40, drag it to frame 25
-Right click over the red timeline, select Snap
-Adjust your timeline to 0 to 25
Refining the Body
-Go to frame 0
-Body TY = 5.5
-Go to frame 25
-Body TY = 5.5
-Go to frame 8
-Body TY = 2.3
-Go to frame 13
-Right click over that frame/key, select Delete
-Go to frame 20
-Body TY = 6.6
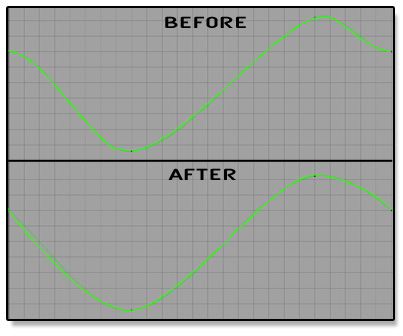
-In the GE
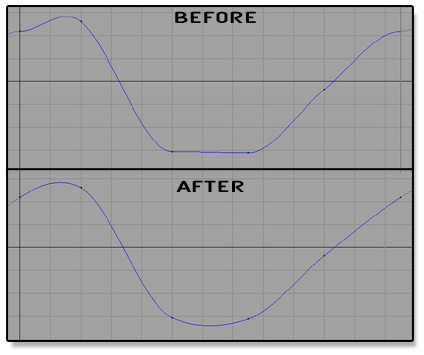
-Select the TY and adjust the tangents to look more like this curve
Refining the Wing Base
-Go to frame 4
-L_Wing_Base RZ = 52
-Go to frame 10
-L_Wing_Base RZ = -60
-Go to frame 10
-L_Wing_Base RZ = -62
-Go to frame 13
-Right click over that frame/key, select Delete
-Go to frame 20
-L_Wing_Base RZ = -7
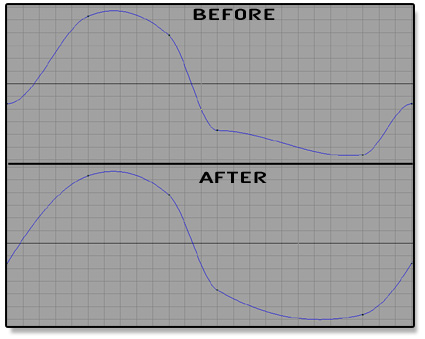
-In the GE
-Select the RZ and adjust the tangents to look more like this curve
Refining the Wing Base Twist
-Go to frame 0
-L_Wing_Base RY = 5.5
-Go to frame 25
-L_Wing_Base RY = 5.5
-Go to frame 7
-L_Wing_Base RY = 2
There will be a hitch at the loop, fix as needed.
Refining the Wing Base Angle
-Go to frame 2
-L_Wing_Base RX = -2
-Go to frame 16
-L_Wing_Base RX = 11
There will be a hitch at the loop, fix as needed.
Refining the Wing Tip Flap
-Go to frame 0
-L_Wing_Tip RZ = -16
-Go to frame 25
-L_Wing_Tip RZ = -16
-Go to frame 5
-L_Wing_Tip RZ = 53
-Go to frame 10
-L_Wing_Tip RZ = 38
-Go to frame 13
-L_Wing_Tip RZ = -37
-Go to frame 22
-L_Wing_Tip RZ = -56
-In the GE
-Select the RZ and adjust the tangents to look more like this curve
Refining the Wing Tip Twist
-Go to frame 9
-L_Wing_Base RY = -4
-Go to frame 20
-L_Wing_Base RY = 1
There will be a hitch at the loop, fix as needed.
Refining the Wing Tip Angle
-Go to frame 5
-L_Wing_Base RX = -11
-Go to frame 20
-L_Wing_Base RX = 1
There will be a hitch at the loop, fix as needed.
Copying the Keys from Left to Right
-Select L_Wing_Base
-In the GE
-Select all the curves listed to the Left in the window, starting from TX all the way down to RZ
-Press 'f' to frame all the curves
-Marquee select all the keys and curves in the window to the Right
-Right click in the Window, Edit > Copy
-Select the R_Wing_Base
-Select all the curves listed to the Left in the window, starting from TX all the way down to RZ
-Press 'f' to frame all the curves
-Marquee select all the keys and curves in the window to the Right
-R click in the Window, Edit > Paste > Option Box
-In the Paste Key options, Edit > Reset Settings
Time Range = Clipboard
Paste Method = Replace
Replace Region = Entire Curve
-Click Paste
-scrub the animation
-You'll notice the rotate Z is wrong
-Select the RZ curve in the GE, then select the keys/curve
-Right click, Edit > Scale > Option Box
-Edit > Reset Settings
-Value Scale/Pivot = -1
-Click Scale keys
-Scrub the Animation
-Scale the RY as well
*you don’t have to adjust the settings this time just Edit > Scale
-Repeat this Copy/Paste method for the Wing Tip's
Finishing the Body
-Select Body
-Go to frame 0
-Body RX = 7
-Go to frame 25
-Body RX = 7
-Go to frame 8
-Body RX = 1
-Go to frame 17
-Body RX = 17
There will be a hitch at the loop, fix as needed.
Body Angle
-Select Body
-Go to frame 6
-Body RY = -1.5
-Go to frame 20
-Body RY = 1.5
There will be a hitch at the loop, fix as needed.
Body Twist
-Select Body
-Go to frame 9
-Body RY = -.1
-Go to frame 17
-Body RY = 1.2
There will be a hitch at the loop, fix as needed.
Body TX
-Select Body
-Go to frame 6
-Body TX = -.05
-Go to frame 18
-Body TX = .05
There will be a hitch at the loop, fix as needed.
Body TZ
-Select Body
-Go to frame 6
-Body TZ = -.05
-Go to frame 18
-Body TZ = .05
There will be a hitch at the loop, fix as needed.
Finalizing the Animation
The wings are going through the grid at the moment. Because the grid is relative, this isn't a big deal, but let’s raise the bird up anyways.
-Select Body
-Go to frame 12
-In the GE
-Select TY
-Press 'f' to frame the curve
-Select the keys/curve
-Hold down shift and middle mouse button, move the keys vertically till the wings no longer go through the grid
As you play or scrub your animation you may think the wings are too slow, floppy or the body should be higher, raise and lower more or less, this and many other options are up to you. Feel free to go back through and redo whatever you wish. Or even add another wing section, perhaps a block for a Head and another for a Tail to make the body have more secondary.