Maya nCloth for Animators
Kiel Figgins - 3dFiggins.com
Maya nCloth for Animators - Tutorial from Kiel Figgins on Vimeo.
Table of Contents
- Overview
- Rigid Body Simulation / Intro to Simming and collisons
- Collisons
- Creating Rivets
- Cloth Simulations
- Jiggle Simulations
- Tips
Rigs used in this tutoral are available at 3dFiggins.com/Store
Overview
Animating secondary elements by hand can be a tedious and time consuming part of animating a character, especially if those elements make up a large part of the character design, such as long hair, a cape or multiple straps. In an effort to reduce this time spent, I've been using ncloth as a base to get simulated motion baked back onto the rigs based off the characters performance. Outside of spending less time animating these extra bits, other benefits are: the performance can change and I can re sim, I can play with the sim settings for varying effects, I'm less hesitant to animate a character with a complex design. Lastly, simulation adds a certain amount of realism and natural noise or chaos to your animation. These subtle shifts, sways and three axis motion would be difficult at best to achieve by hand, though tutorials are available http://spungella.blogspot.com/2019/08/body-mechanics-animating-cloth-by-kyle.html by https://twitter.com/kyle_kenworthy.
But our goal is offloading some of that work, so with that in mind let's get started!
As mentioned above, simulation is about realism, so if your animation is very stylized or exaggerated, decent results may be harder to get. For instance, if your character is moving really fast or your heavily cheating your poses for camera, these will be revealed when you start simming.
Secondly, the goal of this write up is about getting the simmed motion back onto the existing control rig, not about doing sims for renders. This process suffers a loss in fidelity based on how the control rig is set up and what controls are available. This loss in detail would be facets like wrinkles and exact collision contacts. If the control rig doesn't have enough fidelity to get those bits, they will be lost. You will also likely need to spend a bit of time at the end cleaning up the results and fixing penetration or clipping issues.
Thirdly, there are certain elements that are less suited to nCloth and more suited for anim overlap. Elements like antennas, elf ears or other single FK chains that retain their shape/structure and jiggle/sway instead of drap down and react. There are tools out there to help create this dynamic overlap such as https://www.highend3d.com/maya/script/dynamics-fk-joint-chains-for-maya and https://www.youtube.com/watch?v=-H9-cAAoOQc
Lastly, this write up is about getting "some" results, not the "best" results, as quickly and painlessly as possible. Simulation is an entire department and the rabbit hole for getting better results is a long one. If you would like learn about simulations and ncloth there are many other resources online. For now, here are the major steps to getting working results.
There are three main types of sim setups:
1. Rigid Body: a sword dropping, debris, a decapitated head rolling
2. Cloth: loin, straps, skirts, jackets, flaps
3. Jiggles: belly, breasts, muscles
All of these use the same systems but the workflow is slightly different for each. We'll start with Rigid Body as it's the most straight forward and a good introduction to sim scene setups.
Rigid Body Simulation / Intro to Simming and collisons
For our bare bones example scene, do the following:
1. Create a new scene
2. Create a polyCube
3. Translate the cube up and rotate it off axis
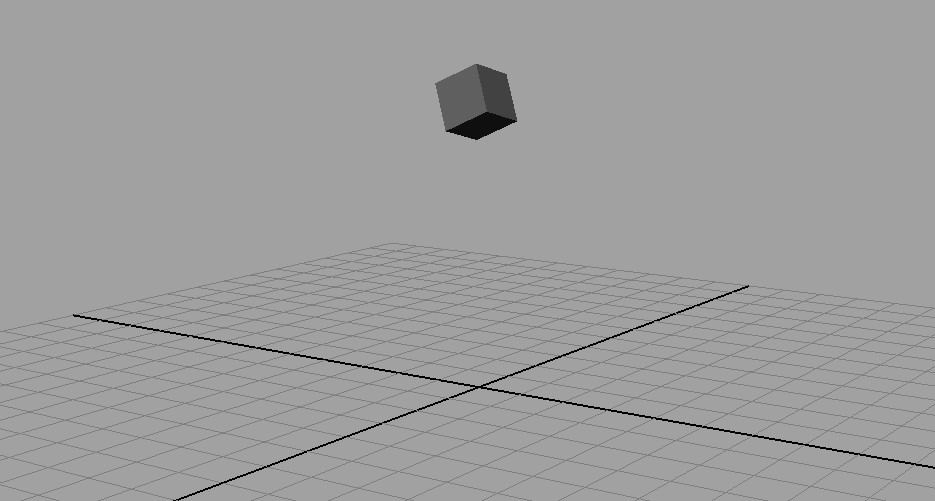
Initial Cube Setup
4. Select the Dynamics dropdown (nDynamics dropdown in older Mayas)
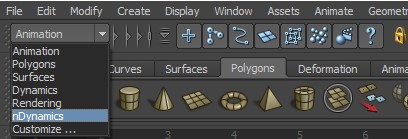
Dynamics Dropdown
5. Select the cube
6. nMesh > Create nCloth
7. Hit Play in the timeline
And magically the cube drops uselessly through the floor! So let's refine this and explain what we're doing.
1. Open the Outliner and select nucleus1 and set the usePlane channel to 1 (or On). This will make Mayas default grid a collision object. You can adjust the height of the grid as well by the planeOriginXYZ channels.
2. In you playback settings, make sure you have Play every frame. Since simulations calculate every frame, having Mayas playback at realtime will cause different results.
3. Extend your timeline to 120. This way you can see the full results of the sim.
4. Create a polySphere, leave it at origin. Select the sphere, nMesh > Create Passive Collider. Now the cube will bounce off the sphere and onto the ground.
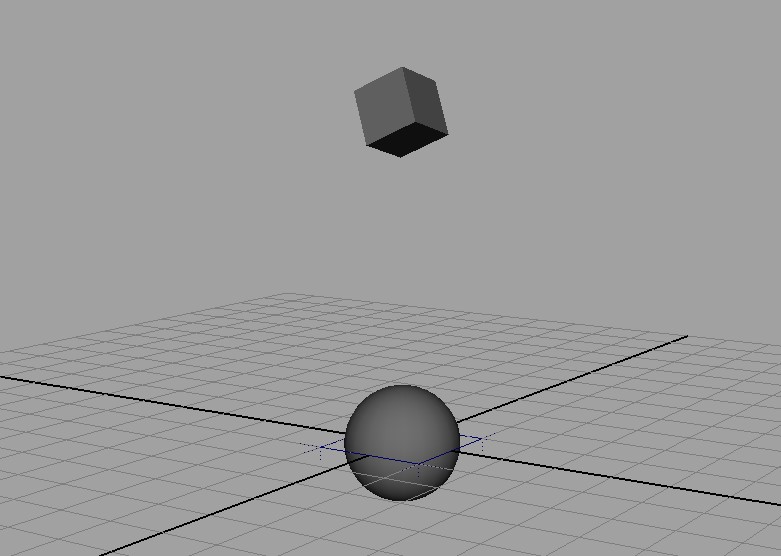
Collision sphere placement
5. Hit play on the timeline
Now we're getting somewhere. The cube should fall, bounce off the sphere and land on the ground. The next phase is refining the actual simulation settings to fit our scene. You'll notice there are dozens of channels on the nucleus1, ncloth1 and collision objects and this can be very overwhelming. What I've found is adjusting two settings gets me about 70% there and let's me decide if I want to spend time tweaking channels in the sim or on the control rig once its baked.
These two settings are the Space Scale on nucleus1 and the ncloth preset options in the ncloth attribute editor.

Space Scale
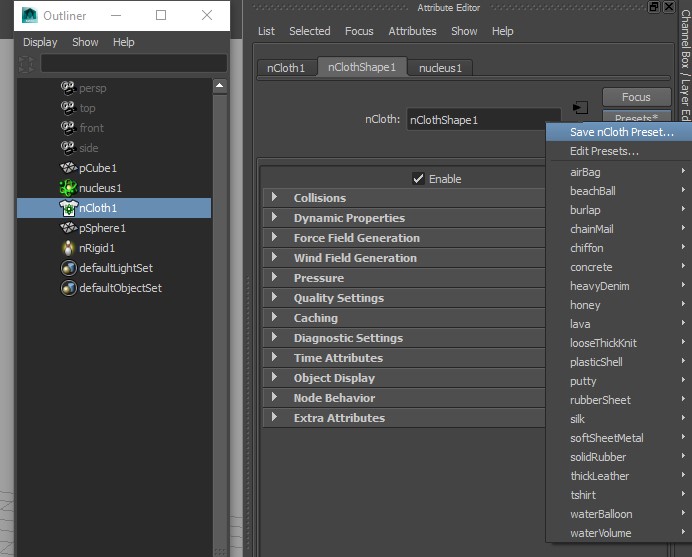
Presets Dropdown
First up, Space Scale. The way nCloth calculates is based on centimetres, so one grid unit is one centimeter. Since characters and scene scales vary wildly, I won't say theres a single value solution. What I do is start adjusting the space scale from 1 to 10 to 20 and if that direction's not working, than from 1 to .1 to .01 and so on. You should be able to find a rough idea to get you started. For our example cube scene, a Space Scale of .1 works well.
Next is the nCloth presets. When you create a new ncloth object, the default settings are rather non descript and generic. Thankfully, Maya has some built in presets to do some of the heavy lifting. Keep in mind that these presets may be less noticable in our cube example, but are much more apparent when doing proper cloth.
To use a preset:
1. Select the nCloth1 node in the outliner
2. Open the Attribute Editor
3. Left click on the Presets button in the top right
4. Choose a preset from the dropdown list, mouse over to 'Replace'
5. Hit play in the timeline
From here, you can quickly try different presets, then see how the results change. You can also right click on the presets to blend in other presets to mix and match. So for this cube, I'd select the Solid Rubber, then blend in 50% plastic shell preset.
As you adjust the preset, you can still adjust the space scale value. Again, we're going for broad strokes, so I changed the Space Scale to .25 in our cube example. Once your generally happy with the space scale and preset, the three channels on the ncloth you can start tinkering with are: thickness, friction, bounce, stretch resistance.
Looking decent
Thickness: since your low poly ncloth object is likely a polyPlane, where as the mesh it represents likely has thickness. Use this attribute to mimic that thickness.
Friction: how much the cloth catches and slows down against itself and collision objects. Especially useful with objects sliding to a stop on the ground.
Bounce: pretty self explainatory, how much the cloth reacts with colliding.
Stretch Resistance: if the cloth is stretching too much or looking like a Yo-Yo or spring, upping this value helps reduce that effect
Approach editing these like you did with space scale, larger steps to see clear results then dial back once you've overshot it.
Collisons
Up next is collisions. We've mentioned the usePlane channel on the nucleus1 and created a polySphere at origin and made it a passive collider. There are two main types of collisions: rigid and deforming.
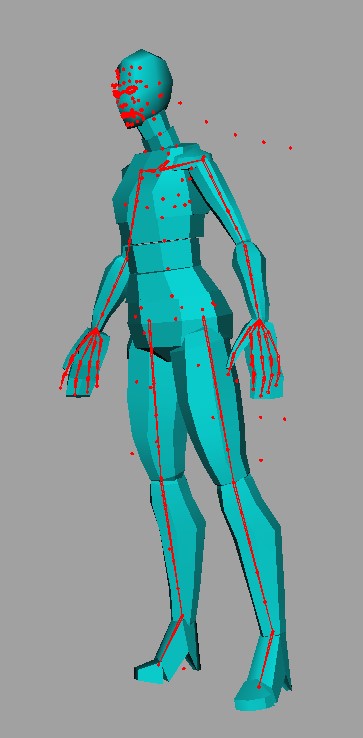
Rigid collisions are typically low poly custom meshes shaped to represent the environment or the character. These are low res to decrease sim time and either constrained or animated to match the character's performance.
Low Res Collision Proxies
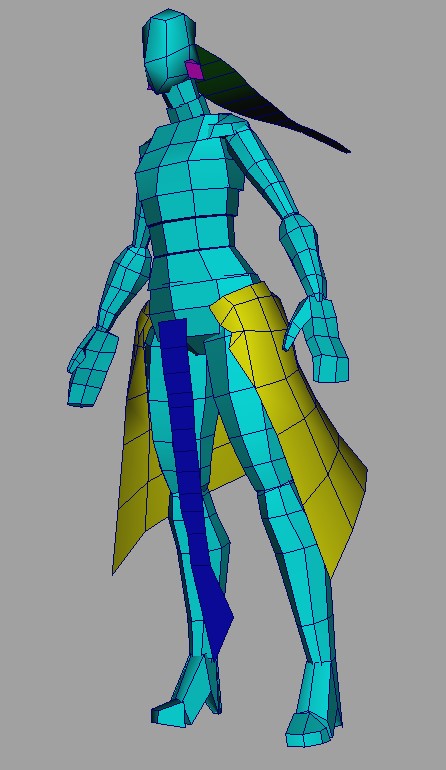
Deforming collisions are meshes that are skinned, cached or blendshapes to more closely represent the characters surface. You can use the actual mesh of the character for this, but you may hit cycle loop errors if your nCloth mesh is part of your character mesh. As seen in the image below, the full body could be used as a deforming collisions for the skirt, but not the loin cloth as it's part of the same mesh.
Deforming Collision Mesh
In cases like this, you can create a duplicate of the mesh and transfer the skin weights or create an alembic cache of the existing animation.
Here are some more general notes about collisions:
A) Create your own low poly collision objects instead of using higher res meshes to increase playback speed, like the collisions shown above
B) Animate or constrain those low res objects to your scene elements. So instead of having a character hit a wall you could animate a cube hitting the wall. Then adjust the speed of the cube with out changing the character performance
C) The three main collision channels to start with are: friction, bounce, thickness. As you adjust these, you'll can also adjust the ncloth values along with it.
Creating Rivets
At this point, you should have sim results that your happy with, but the goal here is to get those results back onto the control rig. You can't constrain the controls directly, since the sim isn't moving the pivot or transform but rather the individual verts. To get this information, were going to use a rivet constraint, like the one found here
https://www.highend3d.com/maya/script/rivet-button-for-maya
I've used that as a base and given it a small UI to make using it a bit easier, you can download the MEL script
HERE (Right Click > Save As)
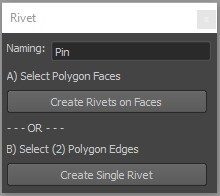
kfRivet.mel UI
To run the script:
1. Download the kfRivet.mel file
2. Open the Script Editor
3. Script Editor > History > [x] Suppress Duplicate Variable Error
4. Script Editor > File > Source Script > locate kfRivet.mel
5. In a MEL tab, run the following line:
kfRivet();
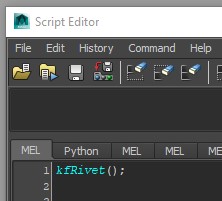
kfRivet.mel Source
With the tool now open, you'll want to do the following:
1. Go to the first frame on the timeline
2. Select a face on the simmed cube
3. In the tool UI > Click 'Create Rivets on Faces'
4. In the outliner, a new locator is created that will stay attracted to that face of the cube
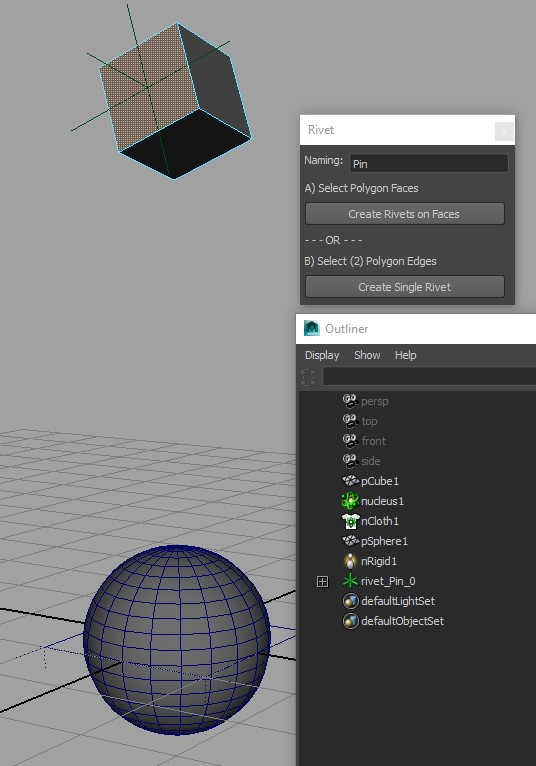
Creating Rivet on selected face
5. Repeat steps 1-3 on two more faces
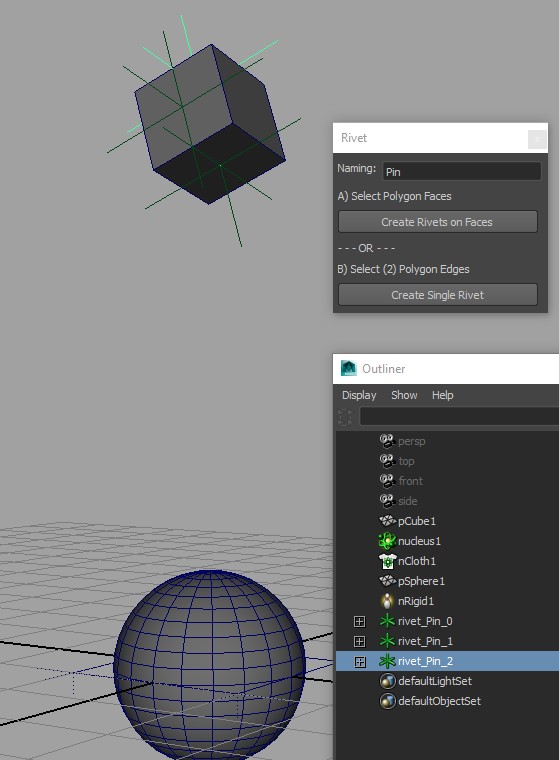
Creating more Rivets
6. Create a nurbs circle and place it where the cube is (This is just a stand in for your control)
7. Select the three rivet locators then the nurbs circle and create a parent constraint with maintain offset on. Then on the constraint, change the interpretation type to shortest.
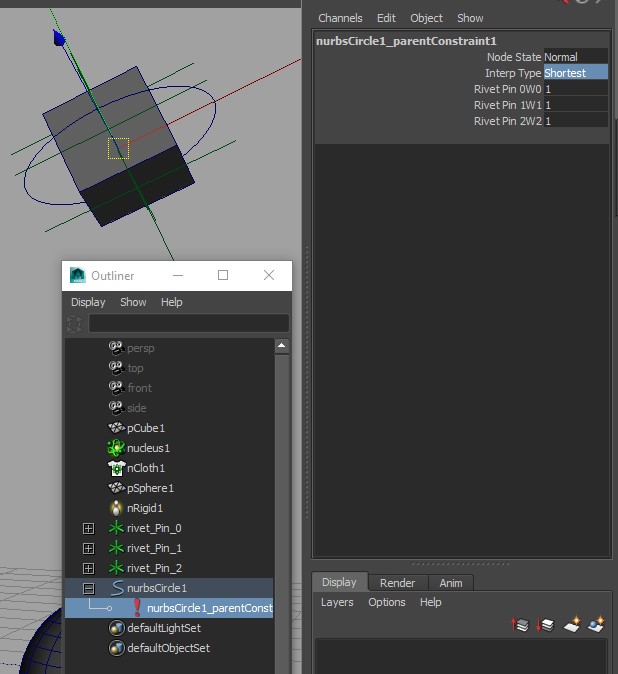
Creating more Rivets
8. Play the timeline

Control Pinned to Sim
The nurbs control's transforms follow that of the simmed cube. The reason we setup three rivets instead of one, is to get a more averaged and accurate representation of the sim without too much time loss from setting up a rivet for each face. Though that approach is possible, it may be overkill and would likely want to be scripted instead of doing that many by hand.
Now that we have the transform data, we'll want to bake it to the control:
1. Select the control
2. Edit > Keys > Bake Simulation > Option box
3. Select the translate and rotate channels
4. In the Bake options, choose Channels: [x] From Channel Box
5. Click Bake
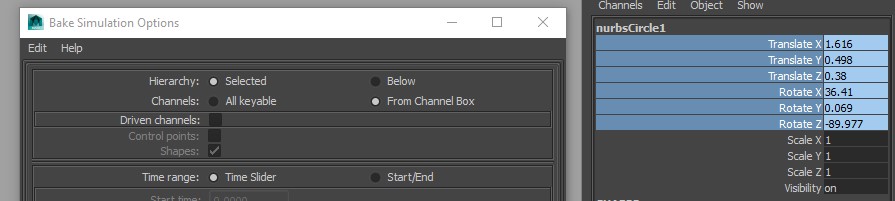
Bake Options
Now with the keys baked, we can clean up our scene by deleting the nucleus1, ncloth, collisions, rivet locators and the parent constraint on the control you just baked out.
With your scene clean, you can edit the keys on your control rig as you would any other animation. Simplify the curves, clean up penetrations, use anim layers to loop or offset, or slip the over all timing to better fit your scene.
So, putting all the above into an actual example using the Nora Rig, follow these abbreviated steps, referring above for more details:
1. Select the mesh_Skull_C
2. Duplicate the mesh and unparent it, rename it sim_Skull (because the mesh is low poly, I didn't need to create a proxy stand in)
3. with sim_Skull selected, nMesh > Create nCloth, rename the nCloth to nCloth_Skull
4. I used the following settings:
nucleus1: usePlane On, time scale 4, space scale .5
nCloth_Skull: concrete preset, thickness .1, friction 4, damp 2
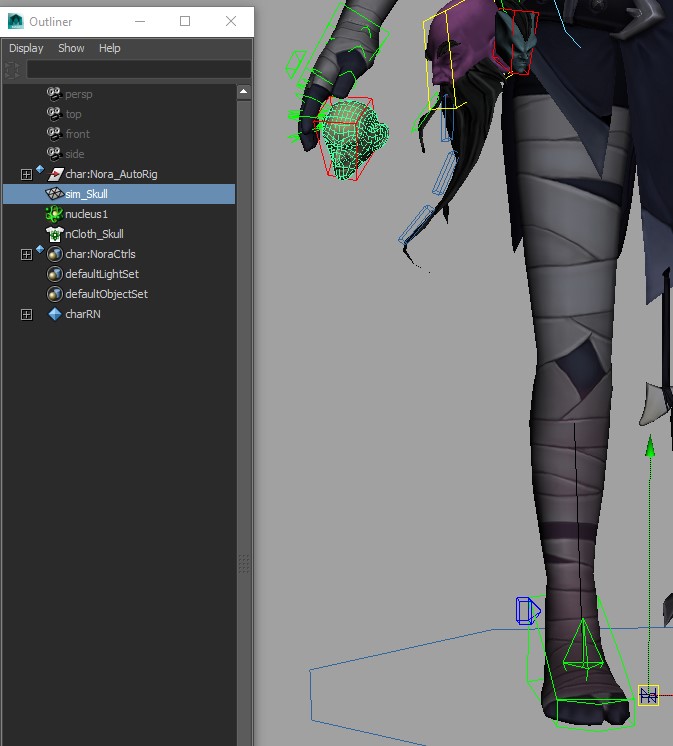
Initial Setup
5. Using the kfRivet tool, I select 4 faces on sim_Skull and create the rivets
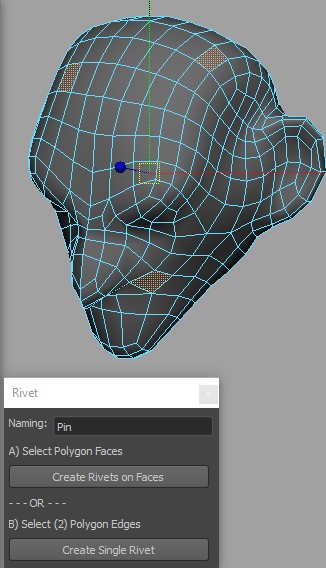
Scattered faces selected for rivets
6. Select the newly created rivet locators, then char:CTRL_Belt_Skull_C control, create a parentConstraint (maintain offset, set interp type to shortest)
7. Playing the timeline shows the control/skull dropping as expected
Skull Control Pinned
8. Select char:CTRL_Belt_Skull_C, Edit > Keys > Bake Simulation
9. Once baked, clean your Outliner by delete the sim_Skull, nucleus1, nCloth_Skull and the rivet locators
Cloth Simulations
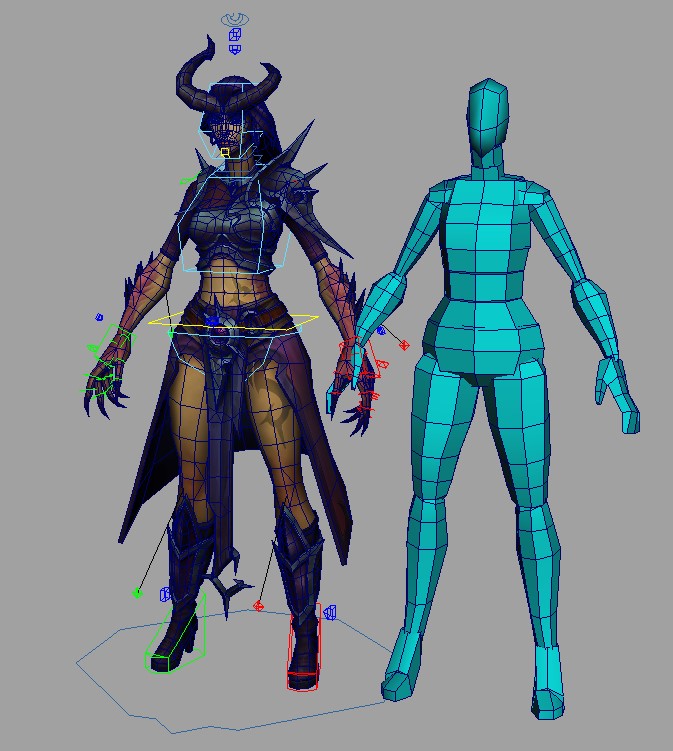
Building of the basics covered in the Rigid Body section, this section is for cloth like accessories (loin cloth, skirts, dresses, jackets, hair, straps) being simmed and baked onto the control rig.
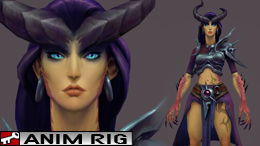
For this example, I'll be using the Drakonia Rig with some mocap applied to it (the mocap was applied with this tutorial). As you see, it's a pretty straight forward animation, but adding a sim to the accessories will add a lot.
Raw Mocap Applied
1. Go to the first frame of the animation and add some preroll to get the character into their default pose. The amount will depend on how fast your character is moving at the start of the animation. The goal of preroll is to get the character up to speed and in roughly a default pose so the collisions arent penetrating the cloth on the first frame. I typically give about 12-24 frames.
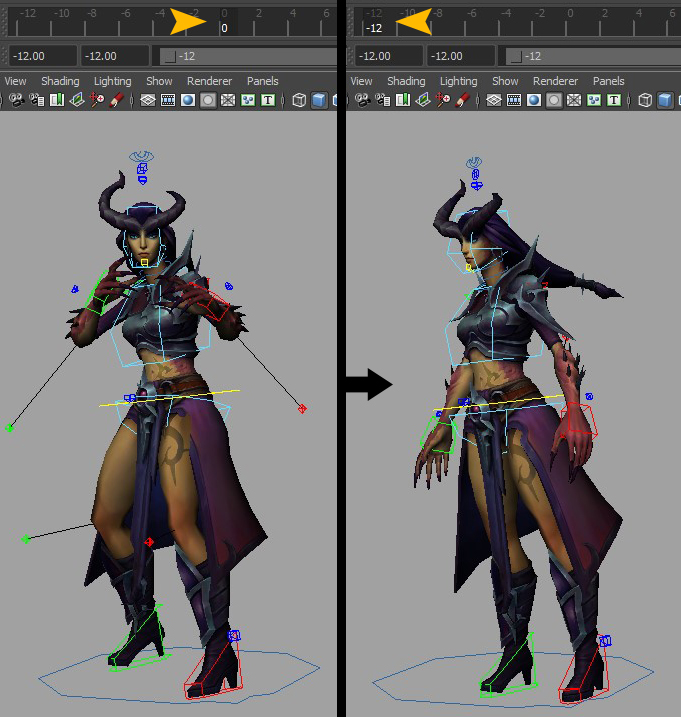
Preroll 12 frames earlier
2. Figure out which accessories are going to simmed, in this case they are: skirt, loin cloth, ear rings and pony tail
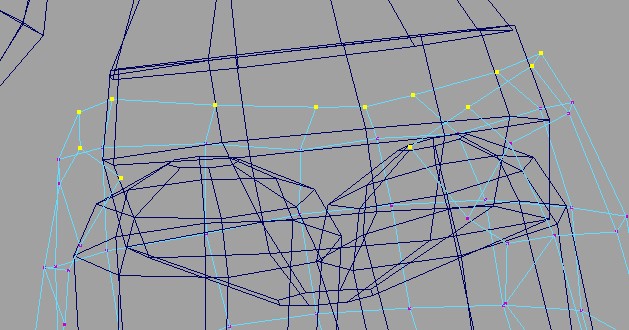
3. Knowing what's going to be simmed, you'll want to create low res poly objects for collisions and constrain them to the joints. For rigs found on my Store the joints can be shown from the jointVis channel on the world control. For the geo itself, I find poly cubes and cylinder work fine. If you plan on simming multiple animation files, it can be easier to create these collisions and proxy sim meshes in the rig file that's referenced into your anim scene so you don't need to recreate each time.
Low poly Collision Objects
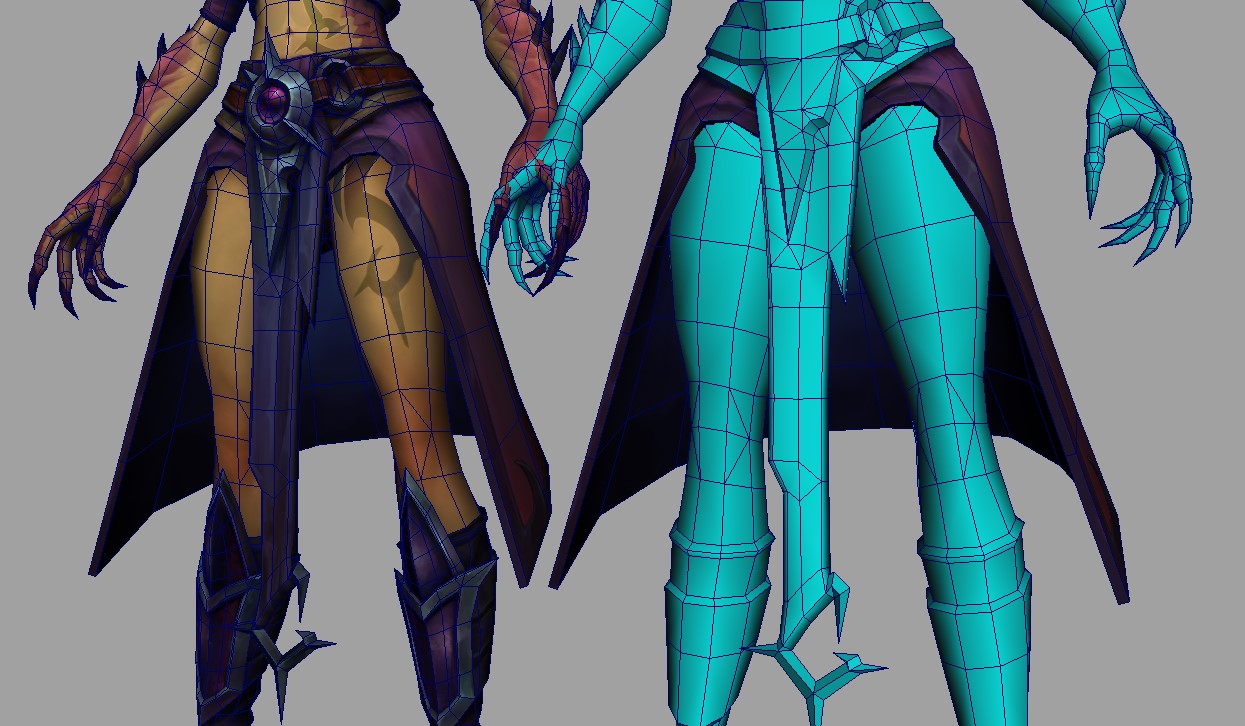
4. Create the poly objects to represent the cloth. A few thing to keep in mind:
A) for cloth I only use poly planes with no depth. If the cloth has thickness I use to thickness attribute when simming to mimic this.
Low poly cloth objects
B) it can be easier to model these object in a different file with the rig inanimate and in t pose and import them into your animation scene, plus you can use them again in another scene.
C) you'll want one face per control, but I tend to double the amount of faces after I laid out the core ones. If a cloth is to low res the end results can be less desirable.
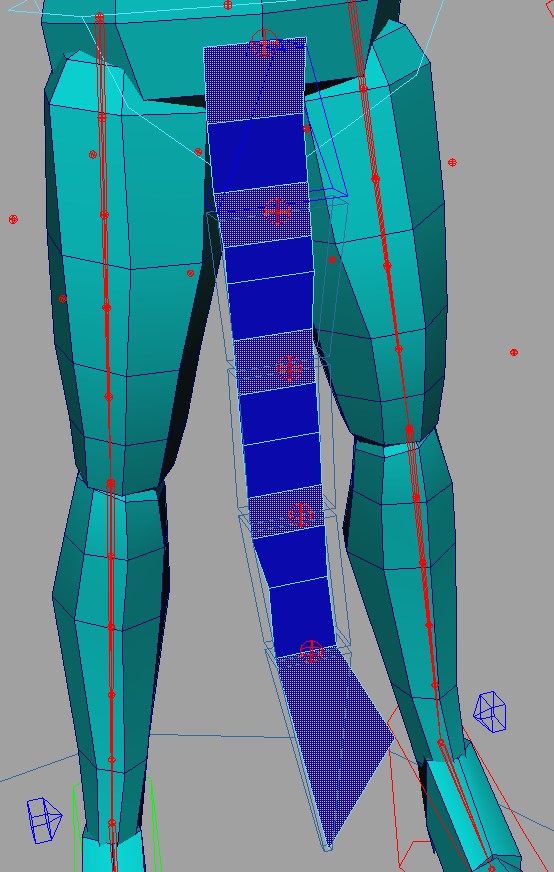
Face count vs Joint Count
D) typically I create a separate cloth object for each item as they sim faster and I can more easily control the results. However, you can combine multiple cloth objects, like the loin cloth and skirt, if youd like them to interact by default.
E) the more complex the cloth the more complex the sim. Finding the right balance of mesh layout, ncloth settings, collision types, etc can take a few tries, so as always, broad strokes.
F) once you've created your meshes, you can approach the sim by either simming them all at once or you can sim one at a time. There are pro's and con's to each. Solving individually takes longer and lacks the immediate interaction of all the pieces, but the upside is you're able tweak the cloth/collision/nucleus settings without distrupting the other cloths that are already working.
5. Create your ncloth and passive colliders
A) select your nCloth proxy poly object
B) nMesh > Create nCloth
C) rename the newly created nCloth node based off the poly object, in this case, nCloth_Skirt
D) Repeat for the other nCloth objects
E) select your collision objects
F) nMesh > Create Passive Collider
G) Group the newly created nCloth collider nodes and name the group
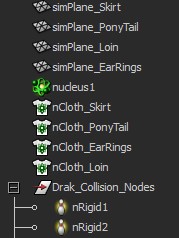
Newly Created Nodes
6. Constraining the cloth to your character
A) select the verts you want to constrain
Rim verts selected
B) nConstraint > Transform
C) rename the newly created dynamicConstraint, such as dynamicConstraint_Skirt
D) ParentConstraint, with maintain offset on, dynamicConstraint_Skirt to the pelvis joint, char:sp_Spine_5_Pelvis
E) repeat for other cloth objects and hit play!
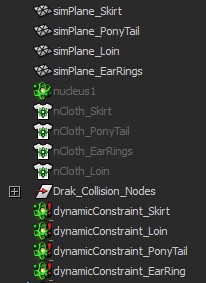
nCloth and Constraint Nodes
Inital Sim Settings are going to need some tweaking
7. Start adjusting the sim settings and presets. These are same ones and process covered in the intro, these include:
A) nucleus1 space scale/time scale
B) ncloth presets
C) ncloth thickness, friction, bounce
D) collision friction, bounce
For this example scene, I adjusted the following:
A) I turn of all the nCloth_...isDynamic channels to 0/off and work on one at a time
B) Set the nucleus1 startFrame from 1 to your preroll frame, in this case -12
C) Settings
nucleus1: sub steps 8, space scale to .06, usePlane on
nCloth_Skirt: tshirt preset, self collide off, thickness .01
nCloth_LoinTail: heavy denim preset, self collide off, stretch resistance 500 (to not have it stretch as much)
nCloth_PonyTail: tshirt, self collide off, thickness .5, stretch resistance 350
nCloth_EarRings: heavy denim preset, self collide off, stretch resistance 500 (to not have it stretch as much)
Sim Settings working well
7. Constraining the control rig to the sim. Now this step could come before step 6 if you wanted to see the results right away on the character, but its risky since you may need to change to the cloth layouts which could mean redoing the rivets and constraints. For now we'll keep it after and assume your generally happy with the sim results.
A) go to the first frame of preroll where your ncloth objects align with your controls
B) create a rivet on the nearest face for each control using the rivet process LINK, though you only need one rivet per control this time
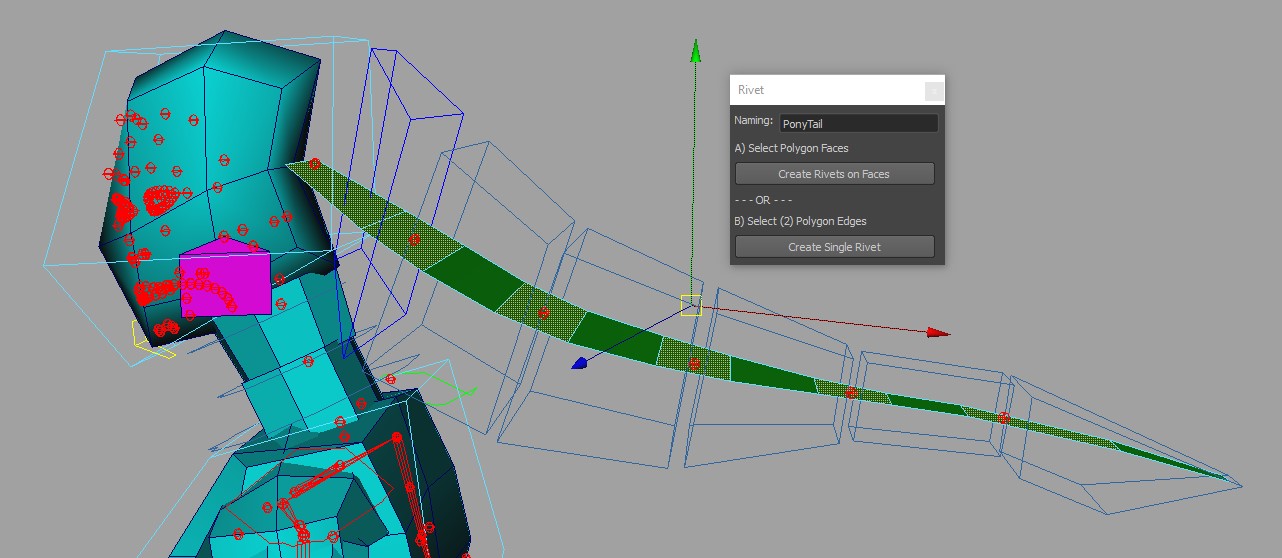
Faces selected closest to joints/controls
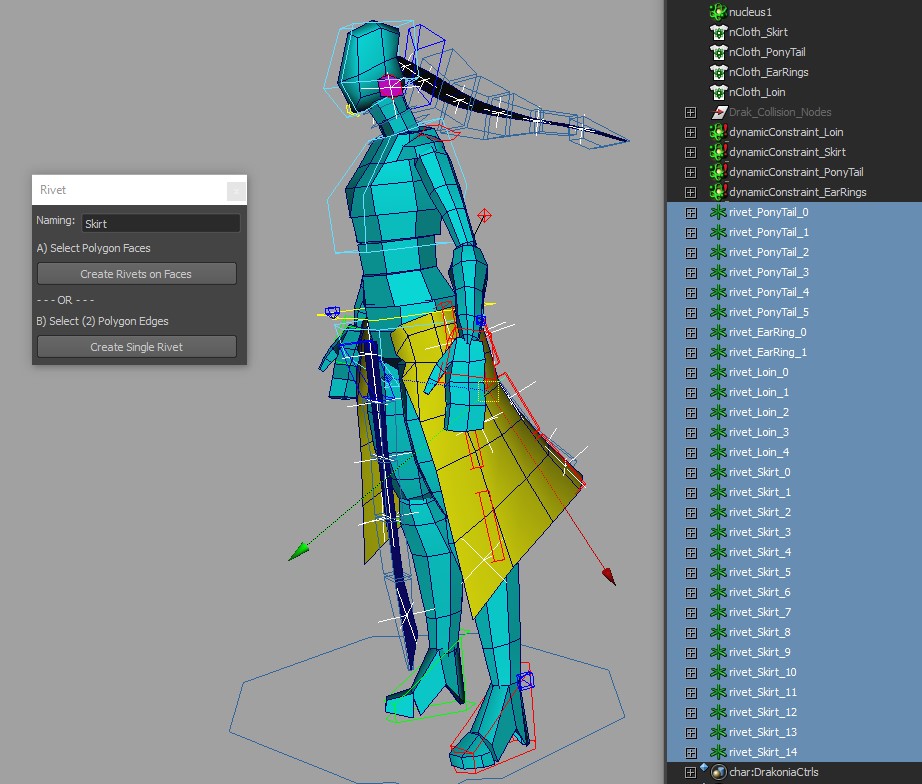
All rivets created for various cloth sims
C) play the timeline again to see the results on the character. It might also be worth play blasting to view it at a proper speed as simming and a rig can slow playback. You may need to adjust your sim or collisions depending on how the end results look on the character.

Controls constrained to the Rivets
8. Baking the sim onto the controls. Again this is the same process covered in the intro.
1. Select the controls
2. Edit > Keys > Bake Simulation > Option box
3. Select the translate and rotate channels
4. In the Bake options, choose Channels: [x] From Channel Box
5. Click Bake
Bake Options
Now with the keys baked, we can clean up our scene by deleting the nucleus1, ncloth, collisions, rivet locators and the parent constraint on the controls you just baked out.
With your scene clean, you can edit the keys on your control rig as you would any other animation. Simplify the curves, clean up penetrations, use anim layers to loop or offset, or slip the over all timing to better fit your scene.
Jiggle Simulations
Again, building off the previous types of sims, constructing a jiggle setup is the same idea but slightly different. The major difference is you'd ideally want access to the rig, as this setup involves copying skin weights. Not impossible to do in the anim scene, but a bit more tedious. Secondly, I don't typically use or worry about collisions for these areas, though they would behave much the same way. Here are the steps for a jiggle setup for a belly:
1. Open the rig file
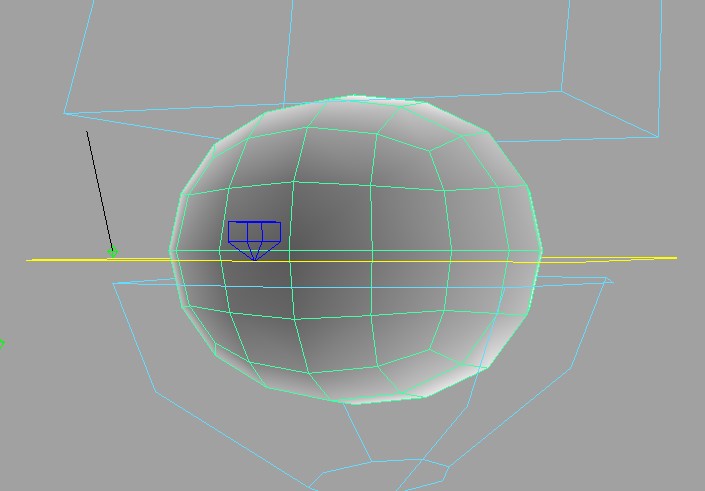
2. Create a polyCube, rename it sim_Belly
3. Poly smooth the cube with 2 sub divisions (I like the even quads and no poles for sims more than a poly sphere layout)
4. Shape sim_Belly to the belly area of the character
5. Freeze Transforms and delete history on sim_Belly
sim_Belly Created
6. Transfer the skin weights from the body to sim_Belly (You can use my skin transfer script here from my paint weights tutorial)
7. Save the rig file
8. Reopen your animation file with the rig referenced in
9. Select sim_Belly
10. nMesh > Create nCloth, rename nCloth1 to nCloth_Belly
11. Set the nCloth_Belly preset to water balloon
12. When you hit play, sim_Belly just drops down, so we need to adjust the Input Attraction so it stays with the original mesh
13. Set nCloth_Belly.inputMeshAttract to 1
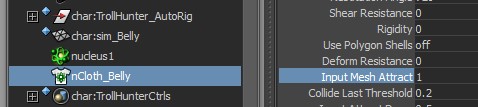
Input Mesh Attract Channel
14. Now when you play, sim_Belly just sticks, not what we want, so we'll need to paint the influence of the attraction
15. Select sim_Belly
16. nMesh > Paint Vertex Properties > Input Attract > Option Box

Input Mesh Attract Paint Options
17. In the Paint Attributes, set the value slider to 0 and the Paint Operation to Replace
18. Paint the front of sim_Belly darker (removing the influence)
Input Mesh Attract Influence
19. Create a small test animation or your existing anim to test the values, you may need to adjust the inputMeshAttract value
Input Mesh Attract Influence with test animation
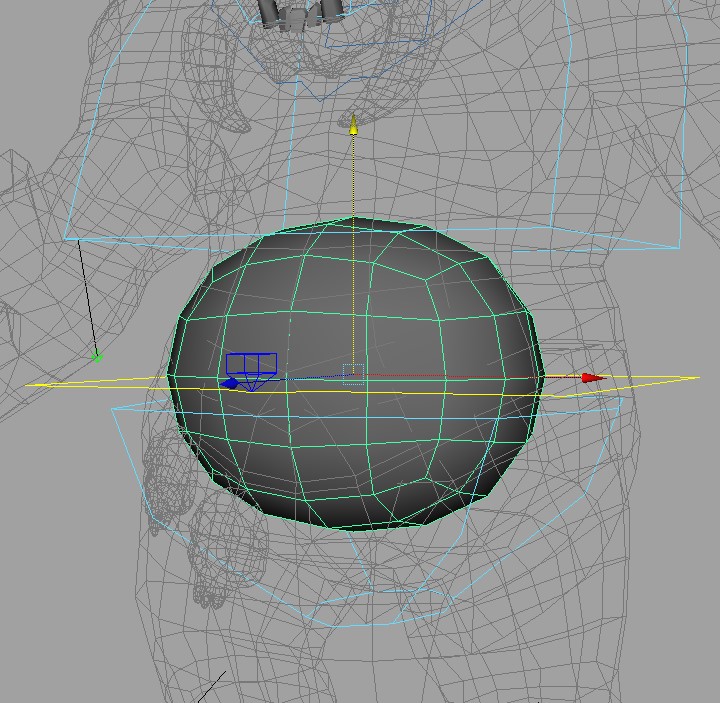
20. Adjust the inputMeshAttract value, if needed, in my example, a value of .65 worked well
21. Using the kfRivet tool, select a face on sim_Belly near the char:CTRL_mMsc_Belly control and create a rivet
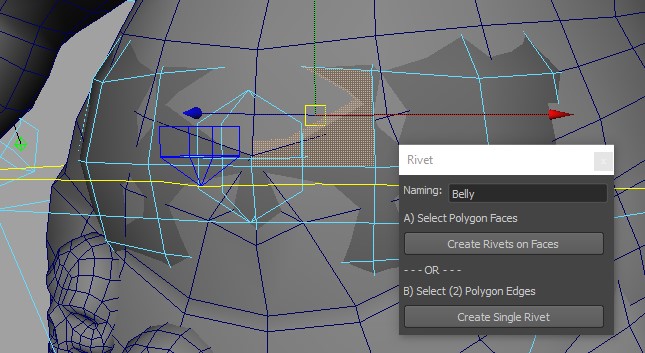
Input Mesh Attract Influence
22. You won't be able to constrain char:CTRL_mMsc_Belly to the rivet, as it will create a Cycle Error (since it's controlling the skinning on sim_Belly)
23. Create another locator (Create > Locator), rename it sim_Belly_Transfer
24. ParentConstraint (without offset) sim_Belly_Transfer to the rivet
25. Bake out sim_Belly_Transfer
26. ParentConstraint (maintain offset) char:CTRL_mMsc_Belly to sim_Belly_Transfer
27. Bake out char:CTRL_mMsc_Belly
Belly control baked from Sim
Now with the keys baked, we can clean up our scene by deleting the nucleus1, ncloth, collisions, rivet locators and the parent constraint on the controls you just baked out.
With your scene clean, you can edit the keys on your control rig as you would any other animation. Simplify the curves, clean up penetrations, use anim layers to loop or offset, or slip the over all timing to better fit your scene.
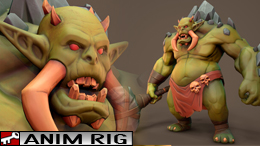
This same setup could be used for the other areas on the Troll Hunter rig, such as his biceps, pecs, thighs, etc.
Tips
1) Start small and lower your expectations. Going from an animation mindset to a simulation mindset can be jarring. You'll want to keep you expectations in check while you start to learn the foundations, strengths, weaknesses and workflows. There's a reason while simulation is an entire department.
2) Keep your sim scene clean. Start off by creating a group and putting all the newly created nodes in that group. Your Outliner can get cluttered really quickly and trying to remember what rivets are where or which nCloths are which can be a pain. Name and organize as you go.
3) Preroll is very important. Having a clean starting pose for the sims to ramp up from will save a lot of headaches. The goal is not to have a T pose at origin, but a T pose from the character's local position at the starting location that slowly blends into the pose and momentum of the animation.
4) Turning of self collisions on nCloth's will make the sim more reliable but less accurate, so if you have sim that just won't work, it's worth a try.
5) If your animation is really fast, you can up the number of substeps on the nucleus1. This will slow down how long it takes to calculate the results, but they should be more accurate. You can also key the number of sub steps if only a small part of your animation needs those additional sub frames.
6) Use invisible collision objects to fake/push results. If you don't want a pony tail to come over a shoulder, you could put an invisible plane above the shoulders to have it collide into or to keep it lower during the sim. I use these types of cheats a lot to help guide a sim that's working in some areas but not in others.
7) Rig scaling and scene scale play a big factor. Trying to get a sim to work on a rig that is scaling is really tricky. Also, if a scene scale huge, this can cause irratic behaviour with sims, so it's something to watch out for.
8) Use wind channels on nucleus1. These could be done on a run cycle to have more active cloth or during your scene if wind is present. It's a cheap way of activating the cloth or again, cheating moments that need tweaking.
Other Opinions, Further References, Typos, and Grammar Issues please contact KielFiggins22@gmail.com